

And this is the last page in the quiet book (24 pages back to back total!). I'm going to try something new after this- I'll highlight different pages of quiet books I've found to be really great (if you have one you think is fabulous, and you want me to highlight, send me the link to: fowlerfam at gmaildotcom). I'll also spend some posts on highlighting tips and pictures of how to do a quietbook group (I had some friends do this last year and I attended one of their swaps and took a bunch of pictures). I'm also going to try and get templates up on each page. So stay tuned!
First off, here's the template I've made for this page:

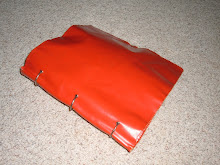
This shoe page is yet another page I copied from my mom's old school quiet book page. There was a page with an old vinyl red shoe I remember as a kid practicing my tying skills on. Here's the template my mom made years ago:

Items Needed: a piece of 7" x 10" in the material you want your shoe and shoe tongue out of. 8 eyelets (for 2 rows of 4), 1 shoelace (make sure it can easily fit through your eyelets, and a shorter size shoelace generally works better- or you can trim it down, although those plastic thingies on the end of a pre-cut one sure come in handy when you are threading the lace through the eyelets).
Teaches: how to tie your shoe! Also teaches lacing, tying a bow or knot.
Cut out the following pieces: (tip: I used pinking shears when cutting out my shoe material- since corduroy frays). Cut out a shoe and shoe tongue from the template pieces (only cut on the blue lines- the dotted lines are for top stitches you'll add later. If you want the shoe to have two different textures (like a white leather toe), then cut out a piece of the other material from the dotted top stitch line (be a little generous when cutting so you have room to sew them together). After you cut out the shoe shape, be sure to cut out the inside part and cut the line that goes up the front of the shoe on the lacing part.
Directions: First you are going to want to top stitch around the opening of the shoe and up the line under the laces. Then, add your eyelets. I have an eyelet tool which works great and is fast and easy for this. You then are going to want to add a top stitch that can secure the shoe tongue in place. Place the tongue piece under the shoe material/lacing slit so that it protrudes a bit out of the bottom, and then sew a stitch out from the left side of the shoe, over to the 3rd lacing hole, up around the lacing portion and shoe tongue top, and then down the right side to the 3rd lacing hole and out to the right edge of the shoe.
Next you are going to want to sew your shoe onto your quiet book page. Center it (and you might want to add a word blog with the text "Tie my shoe!" or "Can you tie me?" or something above it). And then sew it into place. Be sure to only sew around the outside of the shoe (you don't need to sew on the inside or around the hole). This will make it kind of fun too as your child can stick their hand inside the shoe (or even try their own foot! I remember trying that as a kid).
Last step- lace the shoe and tie a bow!
Here are links to really cute shoe pages for more ideas:
Thornock's do 2 shoes
My little sister's

Crafty Chic lyric
Andrea's Original's (with template)

Leafy Tree top's page and template

For a football lacing rendition template, visit Jodell's template


8 comments:
Hi there! I noticed you linked my website (Crafty Chic) to this post. Just FYI, I didn't reinforce my holes for the laces so they're stretching out too much. That's the one thing I would change about mine for anyone wondering. As always, adorable ideas!! Thanks for sharing!
This is the cutest quiet book, with great instruction! THANK YOU so much for sharing your hard work and talent! I added your button on my blog.
Thanks again for the great ideas! I finished up on Book #2...Yeah! I really had no idea how long it would take...It was a lot of fun though!
I wanted to say thank you. Feel free to check mine out on our blog.
Thanks for the great quiet book instructions! I have just finished my 2nd quiet book and really appreciate the help i received from your blog.
I just found your blog and I have to say you are a genius!! Thank you SO MUCH for sharing your ideas. They are awesome!
This is the cutest quiet book, with great instruction! THANK YOU so much for sharing your hard work and talent! I added your button on my blog.
Thank you for all the designs and how-to's. To help young students with severe intellectual disabilities in school I often add textures to "store-bought" books but your ideas are so much richer.
Karen
OTinPublicSchools.blogspot.com
Post a Comment