
 Page #2: Traffic Light
Items needed: black felt or material, red, green yellow felt, Velcro.
Teaches: safety, traffic light understanding, color coordinating/placement, using Velcro
Cut out the following pieces: Black traffic light shape (1), red felt circle (2), yellow felt circle (2), green felt circle, Velcro squares (3).
 Directions: After cutting out the black traffic shape (I used black material instead of felt and folded/sewed over the unfinished edges- but using felt would probably be easier since you don't have to fold over/sew the edges), you are going to want to sew on 3 of the Velcro squares onto the black traffic light. Just sew on 1/2 of the Velcro to the traffic light of course (the other 1/2-fuzzy or sticky side, you will be sewing onto the red, green, yellow circles). Once the Velcro is in place, sew the black traffic light onto the muslin fabric page. Remember to position it according to whether it is a back or front page, and you may want to leave room for the little traffic light rhyme if you are putting that on the page too.
To make the circle lights, you will want to make them double strong of felt (why you cut out 2 circles of each color). But before you sew the circles together, sew the other 1/2 of the felt pieces onto one circle from each color. Make sure the Velcro placement allows for them to be Velcroed onto the traffic light in an even manner (not overlapping). Once the circles have Velcro on the back, sew the same colored circles together, so that the circle lights are double thick with Velcro on the back. Position them on the traffic light with red on top, yellow in the middle, and green below.
Optional: If you want, you can add a little word/rhyme box (traffic rhyme) like I did with some pellon fabric and permanent markers. Write the word on the pellon, cut it out, and then sew it on the page.
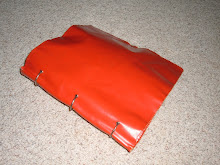
Here's a pic of the traffic light page in my mom's book which inspired this one:
 And here's a link to a sketch my mom made when she was creating her book. You can enlarge it and print it out to use it as a template (like I did) if it helps:
Page #3: Road page
 Items needed: one toy car, various colored felt, ric rac, iron-on adhesive or iron-on patch, 1 small snap.
Teaches: unsnapping (garage), line-following, imaginative play
Cut out the following pieces: black/grey felt road (1), large rectangular shape (with one end wider than the other) of felt for garage (1), assorted shapes for felt houses/buildings/roofs (4), felt trees and stumps (4), felt lake (1), white felt arrow (1), little windows/doors cut out from iron-on adhesive or patch for houses/buildings (10-13), yellow ric rac (1).
Directions: cut out the road felt piece so that it fits on the page appropriately. Sew the yellow ric rac down the center of the road piece. No need to cut the ric rac at turns, just fold it over one time in the direction you want it to go. Sew on a white felt arrow to the road felt if desired. Pin the road piece onto the muslin page (placing it appropriately on the page as to whether this is a front/back page).
Put windows on the buildings/houses by using either iron-on adhesive between felt or a jean iron-on patch.
Place the cut out houses/buildings, trees and lake around the road. Leave a rectangle place for the car garage. Sew the road felt into place. Then sew on the houses/buildings/trees/lakes into place. Then, take the garage felt (skewed rectangle with one end longer than the other) and hand sew a snap half onto the end of the piece of felt that is a bit wider. Sew the garage piece into a rectangular space (but allowing the end that is a bit wider to pull up, so the car can be placed into it, and forms a pocket). Sew the other snap side underneath the garage, so the pocket snaps shuts. Make sure as you are making the garage, you can get a matchbox car or similar to fit into it nicely.
Optional: instead of using a matchbox car, you could make a little car or two out of felt and tuck those into the garage instead (this would make the page lay flatter too!)
Here's a pic of my mom's road page that inspired my own:


.jpg)
6 comments:
hey! thanks for your help! I started mine and have finished like 5 pages but everytime i look at yours I could kick myself because i like what you did better. haha thank you!
Yeahoo! I'm so glad I found your site! I've started my quest to conquer the "quiet book". I love your tips and pics of your pages. Keep posting!
What is the traffic light ryme? Thanks
It is: "Red on top, Green below, Red says stop, Green says go. Yellow says wait, even if you're late!"
Do you have a template for the road?
I made a traffic light similar to yours in my latest quiet book! I linked back to you :) http://thenotsoboredhousewife.com/?p=386
Thanks for sharing!!
Post a Comment