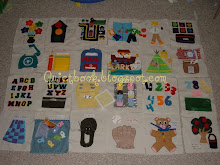
 There are a number of ways you could make this page. I used iron on letters fused onto different pieces of colored felt. If you could find felt letters pre-cut to begin with, I would use those as that would eliminate the steps of having to iron on the letters to felt, and then cutting the felt pieces to match the letters. I couldn't seem to find any alphabet-shaped felt pieces so I had to make mine "homemade" style.
Items Needed: 1 pack of iron-on letters (these are found at any fabric store. I've even seen them at walmart), enough felt to fuse the letters onto (I made my letters rainbow colors, so I used a bit of red, orange, yellow, green, blue and purple felt), 2 ft. of a 3/4" wide Velcro strip (sew-on, not fusible*), and a rectangle of fabric to make a letter pocket at the bottom.
*I prefer to use Velcro that isn't adhesive and can be sewed on. The reason is, is that in my opinion, stitches usually last longer than adhesives. If you try to sew on the adhesive Velcro, then you will run into a gummy/sticky needle which is not fun to sew with. So my advice is to just get a pack of sew on Velcro.
 Teaches: Letters of the alphabet, order, spelling, Velcro.
Cut out the following pieces: First, I cut out little rectangles of felt that matched up with the letters they were being fused to (notice I cut them out each as rectangles first. I didn't trim them to shadow the letters until I had first sewn the Velcro on the back and then fused them to the iron-on letter. This way I didn't have to stitch the Velcro on through the fusible fabric, which can make your needle sticky, and just the felt. It also makes so you don't see the stitch used to sew on the Velcro). You will also want to cut out your pocket. My just consisted of a long rectangle (7" x 3") and a lid for the pocket (7" x 1.5").
Directions:I first cut out my iron-on letters so that I had the entire alphabet in caps (A-Z). Then, I cut out rectangles of felt that would fit those letters in an assortment of colors, so the rectangles were different sizes depending on the size of the iron-on letter. So, for example, the W needed a large rectangle of blue, but the I just needed a little rectangle of yellow. Don't trim the felt to match the iron-on letters just yet, leave them as rectangles until you get the Velcro sewed on and letters ironed on.
Then, you are going to want to position your alphabet how you want on the 2 pages of muslin. I was able to fit A-P on my first page (4 rows, 4 letters to a row), and then Q-Z on my second page (3 rows, and the bottom 1/3 of the page was reserved for a pocket to store letters). Then, you are going to want to sew little squares of Velcro onto the back of the felt rectangles. Now I put the scratchy side of Velcro on the felt and the soft side of Velcro on the muslin, but you can do it either way. In fact, as I was ironing on the letters to the felt, I got nervous since the scratchy Velcro was on the back of the felt and was plasticky- I thought it would surely melt. It didn't melt, but I did place a cloth underneath just as a precaution. If you wanted to not have to worry about anything possibly melting, you could just make sure to put the soft side of the Velcro on the felt rectangles instead of the plasticky, scratchy half of Velcro.
To sew the Velcro squares on, first sew them on the back of the felt rectangles, then sew the other half of Velcro directly onto the muslin page, making sure to position them first where you want them on the page before sewing. Once the Velcro is all sewed on, then you are going to want to iron on the letters to the felt rectangles. Make sure to follow all directions given on the iron-on letters package.
 Lastly, you are going to want to sew on a pocket. This is done real easy by just sewing around the bottom and sides of the rectangle (reinforcing on the side tops since it will get tugged on more up there), and then sewing on a little lid (I first sewed on a little "letters" word box onto the lid first). To make it so your pocket doesn't fray, you can either fold over the borders of the fabric of the pocket box/lid, or just use pinking shears and sew it flat on like I did. The pocket is fun to have to stick all the letters in when your child is using the blank page to spell something or put the alphabet in order.
Also, you may want to make duplicates of some letters if your child's name has double letters since that is probably something they will want to practice a lot. Just store the extra letter(s) in the pocket.


.jpg)
6 comments:
I just looked on etsy and someone sells them on there for 50 for $5.00 check them out. I also have access to cutting them. Just in case etsy doesn't have the font you need I have the font that you have used on your quiet book.
I just came across your quiet book and love it! That will be a great birthday present for my 5 year old nephew. He has a handicap and therefor quite a bit behind - this will be a very nice present.
Thank you for sharing this idea!
Marina.
anna! you're amazing! did you know your blog was featured on "Crafty Chicks?" that is so crazy! you rock!
anna! you're amazing! did you know your blog was featured on "Crafty Chicks?" nice work! you rock!
what if my iron-on's cannot be ironed onto felt? I have to pack that are shown in your picture (not the finished page) but i don't think that i can directly iron them onto felt- it needs to be cotton...
HELP!
~shimmy
Shimmyshimmy- I would still try to iron them onto the felt. My letters said on them that they aren't recommended to apply to synthetic fabric. I don't even know if my felt was synthetic or not- probably some of it was/is, but it still worked fine. You could test it out. It may be just fine to apply it to your felt, as in my case.
Post a Comment