
 Items needed: felt pieces in different colors for shapes (star, diamond, square, circle, triangle, plus sign), a bunch of black felt for squares and box, 7 snaps, and optional ric rac and pellon for text box.
Teaches: snapping, matching, colors, shapes.
Cut out the following pieces: 3 copies each of the 6 different shapes (cut them out over sized/bigger than the black squares since you end up trimming them in the end), 6 black squares (mine where 2"tall/wide), and a shape box out of 2 rectangular pieces (lid and box) out of any color of felt (I used black).
Directions: Cut the 6 black squares to a size so that they fit nicely 3 across & 2 tall on the quiet book page. For each shape, you need 3 copies (one for sewing to the page, and 2 for sewing together and making the pieces). Trim down one of the copies of the shapes and sew onto a black square and repeat for 5 remaining shapes/squares. Before you sew the black squared shape onto the page, sew bottom halves of snaps onto the centers of each piece. Then sew piece (which consists of 1 black square, 1 shape and 1 snap bottom) onto the muslin page, and repeat for 5 remaining pieces.
For the shape pieces, first sew top halves of snaps onto one of the felt pieces for each of the 6 shapes. Then, sew the 2 pieces of felt together, so the snap is on the outside. After sewing together, trim down in size so it matches the shape on the black square and fits nicely in the black square.
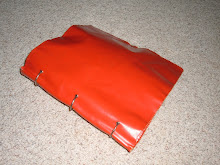
Now, your done with the hard part. The shape box is easy. Take the 2 pieces of felt in rectangular pieces (one making the lid, one making the box), and sew on any rick rack or a "shape" text box from pellon if desired. Sew on a snap bottom to top rim of box, and a snap top onto the underside of the lower rim of lid (or you can wait and sew on the snaps after you've sewn the box onto the muslin- I think I may have done this). To sew the box/lid onto the lower half of the muslin page, just place the bottom box and sew around the sides and bottom edges (making a pocket). Then place the lid on so that it overlaps a bit/the snaps match up and sew the sides and top. I didn't sew all the way down on the sides on mine (maybe 1/2 way down on the lid), so that the lid could swing open upwards. But do make sure when you are sewing this all onto the muslin, you are doing a reverse stitch a few times at the end of each stitch line so that it all stays sturdy on the page and can withstand numerous little tugs on it while your kiddo is opening and closing the box.
To play: put the shapes in the box and have your child, remove them and match!
My sister made a simpler rendition of this page- she did one with just shapes (no black boxes) as well as she also did a really cool page with a simliar idea, but with mathmatic equations! Check 'em out!
And here's a pic of the original from my mom, Alice's book:


.jpg)
10 comments:
yipee! I admit I was gonna comment and pester you for another post - but then I figured it's December and to leave you alone as I'm sure you DO have a life outside of this. That said, thank you for the new post!
Oh Goody! I'm so glad to hear that someone is in fact USING these instructions. I kind of thought maybe this would be something my kids/grandkids would utilize someday when they are fighting over my one quiet book and having to make their own. I am delighted to hear that someone out there in cyberspace is really making one!
Thanks for hosting this blog! Gosh, I had the same desire you did... remembered my mother's quiet book growing up and wanted to make one for my family. She gave me her to use as a pattern but I was looking for more ideas. I came across your blog through Google. Once mine is finished I will send you a pic. Thanks for your hard work and example. You have inspired me!
Wow! thanks for hosting a wonderful blog. I came across your blog through google. Like you I borrowed my mother's quiet book and was trying to replicate it... but wanted more ideas. Thanks you again for your hard work. I will try to send a pic when I am finished!
Hey, this looks awesome! A quiet book has been on my list of things to do for a long time! Thanks for sharing.
Love all of these ideas and the pictures are great! Keep up the good work. I'll definately be using your instructions as I make my daughters a quiet book.
So glad to hear you guys are making your own quiet books! Do send me a pic when you finish.
I remember when I made mine, my husband would say "good job honey", but that was about it. I usually had to go call my sister up and tell her about the page and email her a picture, so I could get adequate and mutual excitement off of her, and feel like someone was as proud of it as I was!
I have religious quiet book ideas if anyone wants any.
I love this!!! I'm so excited I'm going to get started on a cupcake page right now! Thank you for your time and creativity.
Thanks! I love it! Check out mine at http://debrasnowsart.blogspot.com
Post a Comment