
 This was one of my most favorite pages to make (along with the closet/getting dressed pages). I think I enjoyed it more because it got more of my creative juices flowing than the other pages. This page was actually thought up with the help of my friend Amy, who originally found the cute little felt cupcakes in the dollar bin at Joann's. She was showing them to me one day during a playdate and we started discussing what sort of quiet book page we could whip up to incorporate these cute little felt yummies. I have to admit, I love to see my boys practicing baking too ;) There's nothing that makes a mom more proud than to see her boys skillful and adept in the kitchen- so don't just think this is a girlie page! I only have boys, and they love "cooking cupcakes", and pretending their "H-h-h-hot"!
 Page #14: the oven
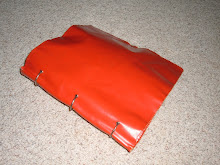
Items needed: big felt piece for the oven, white pellon for the stove burners and panel of dials, some silver/metallic material, fun patterned material for inside the oven, 10" of an elastic cord/string, some felt scraps for the oven handle & circle-thing to anchor the hot pad's elastic string to the page, a small hot pad (consisting of 23" of thin white binding, two 4.5 x 4.5" squares of material, and a thin piece of batting cut in a 4.5" x 4.5" square to make it a bit fluffy like a hot pad should be), a small rectangle of velcro (to hold the oven door shut).
Teaches: cooking, imaginative play, counting, pockets, how to use a hot pad.
Cut out the following pieces: From the felt, cut a large oven shaped piece, with a little oven door cut out (that pulls down to open- I used pinking shears at the top for this, hence the zigzag cut at the oven door top), and a little oven door window cut out (a 2" x 1" rectangle). Cut a long rectangle and a circle from the felt scraps (a different color than the oven) for the oven door handle and the hot pad anchor. Also cute a small rectangle from the metallic fabric to use as the oven window. Cut it slightly bigger than what you cut the oven window in the big piece of felt. Cut out a large piece of fabric in sort of a skewed box shape (bottom 1/2 of the box is wider than top 1/2) to be used as the backing of the oven (seen when the oven door is opened. Lastly, cut 3 little ovals out of pellon (to be used as the burners), as well as a long rectangle to be used at the top of the oven as the dial/clock range.
Directions: Before I started, I sketched out my oven on a piece of paper to practice with how I wanted it to look and the right angles. I recommend doing this or if you like my oven, print off the picture and try to trace off of that. It's best to cut an oven out that has angles to it (see the angles in mine?) as it will make it easier when you are sewing it onto the page and differentiating the range from the oven. Okay, let's get started!
To start off, you are going to want to get your oven pieces you just cut out placed right and ready to go before sewing it all together. I would start off with the pellon. Take the white pellon oval pieces and with a black permanent marker, draw swirls on them to make them look like little burners.
 With a finer tipped black permanent marker draw the dials and clock on the long rectangular piece of pellon. I used a pink permanent marker to accent this. Once you have these pellon pieces, set them aside (you'll sew them on after you get the oven door finished).
To start working on the oven door, first take your metallic material for the oven window, and if it is like mine, it probably frays, so you are going to want to either fold it over on the edges, or do a double stitch around the oven window like I did. Sew the window in place. Then you are going to want to sew a little oven door handle on there above the window with that felt scrap rectangle you cut out earlier. To do this, you are going to want to sew on the velcro at the same time (my velcro and oven handle are the same size pieces), so with the handle on front, and the velcro on the back, sew it into place. With the other half of the velcro, save it for later when you sew it onto the material used for the inside of the oven. Now sew a top stitch around the oven door. This will help keep the door from pulling/stretching.
 Now with the oven door done, you are going to want to sew on your pellon stove top pieces. For the burners, I just sewed circles to keep them in place on the range. Next, you are going to want to place the material you want on the inside of the oven and make sure it fits nicely behind the bottom half of the oven appliance. I even trimmed my down a tad so that it wouldn't stick out around the edges. You can either sew on the velcro now or sew it onto that material when you are sewing everything to the page. I did mine before so I could get it over with, but if you're worried about your velcro shifting during top stitching, you could also sew it on later.
Place the oven on top of the material used for the inside of the oven, and place the entire piece on the muslin quiet book page where you want it. Now begin to top sew all around the oven (its borders, its creases(the places where you want it to look like a different angle/dimension is occurring- like at the top of the stove top, at the bottom of the stove top, around the front of the oven). If this stitching doesn't make very much sense, look at this oven picture and notice where the top stitches are on it. Remember I am not only using the stitching to stitch the oven to the page, but also to give the oven depth and dimension. Maybe other people don't really care to make your oven look 3-D, but I wanted that effect, hence the top stitching. It also serves as a good reinforcement to the felt. Speaking of reinforcing, I back stitched a few times where the oven door slit began on the left and right. I knew the door would be tugged on quite a bit and wanted to make sure it was reinforced adequately.
Once your oven is all sewn onto the muslin, you are going to want to make the hot pad! To make my hot pad, I actually just took a hot pad from our kitchen drawer and tried to copy it, just mini-size. My hot pad is 4.5" x 4.5" big.
 To make it I first took 2 yellow squares of fabric, placed a thin piece of batting between them, and sewed diagonal lines (1" apart) from the left and and then the right to give it a genuine hot pad look. Then I placed the white binding tape around the ages, leaving a few inches at one corner to loop around and make a hot pad handle. I sewed this binding tape in place, and walla! you got yourself a kid-sized hot pad. I tied the elastic string around the loop and then placed the other end of the string under a felt circle and sewed that circle onto the page. I was a little worried about the string becoming unattached and making its way out of the circle, so I back stitched a bunch on the felt circle to make it a solid little anchor for that thing. There you have it. You're very own quiet book oven page! Now let's start cooking!
Page #15: the cupcakes and pan
 Items needed: big rectangular piece of metallic material for the oven (7.5" x 9.5"), 6 cute little felt cupcake pieces from Joann's dollar bins (I found these in 2007/8 in packs of 10, so they very well may not have these anymore, if you can't find them, just make them yourself by cutting out cupcake-shaped felt pieces and sewing on little sequins to look like sprinkles on the top (or if you are super crafty, you could make little cupcakes that look like this), and an assortment of felt to make the 6 little felt cupcake liners/cups in different colors (I chose the classic pink, yellow blue since they reminded me of real cupcake/muffin cups).
 Teaches: cooking, imaginative play, counting, pockets, how to use a hot pad.
Cut out the following pieces: Cut the metallic material to a 8" x 9.5" rectangle, cut the cupcake cups so that they fit around the bottom of the cupcakes (mine were a trapezoid shape being: 1.25" wide at the base, and 1.75" wide at the top, and 1" tall) I cut these cups with pinking shears at the top to give them the zig-zag cupcake liner look. I also cut out a long rectangle of pellon to write the words "count the cupcakes" on and sew to the top of the page.
Directions: To start off, you are going to want to fold over the edges of the entire pan/metallic material. My material frayed quite easily, so it was important to to do this so the pan would stay in tact. Be careful about ironing- some metallic materials will melt under an iron. I folded over about 1/3" inch and then folded that over again and then sewed this fold into place by sewing around the pan's border. Then I sewed the empty pan onto the muslin quiet book page, just by sewing right over the border stitch I just sewed.
 Then you are going to want to sew the felt cupcake liners into place. Place them where you want them on the pan, and sew around their base and sides (so that you are sewing them onto the pan and the muslin page). Back stitch a couple times there at the top of each of the sides to give them reinforcement. Make sure the cupcakes can slip in and out easily of the felt liners. If you want a text box at the top, right something like "count the cupcakes" or "cook the cupcakes" on a piece of pellon and sew that right onto the muslin. There you have it! 6 delicious little cupcakes to nibble on and cook over and over!


.jpg)


11 comments:
I just did a search and found a link here from your other blog. This is awesome!!! I've been wanting to do a quiet book because my son turns 1 in a month (I never did one fir my first, but I figured now is the chance). I saw some cute ideas on handmadebyjill.blogspot.com too. Thanks! I am excited to start.
I am so glad I found this. Thank you for showing in detail all of your steps. I have 2 little girls and I can't wait to start making this. I am on maternity leave right now and I was looking for a project I could work on.
Hello Anna! THanks so much for stopping by my blog and for leaving me such a lovely comment about my QB. You are obviously someone who appreciates the hard work that goes into making one of them :) And I LOVE LOVE LOVE your QB as well. Oh, it is so great to meet people with such great talent. You are more then happy to link back to my pages. Have a great day :) -Becca
Hey I finally finished my quiet book http://sarahmayberry.blogspot.com/2009/07/quiet-book-tutorial-girl-addition.html
I love this cupcake page !
You are amazing!! This is the best and cutest quiet book I have ever seen. I found it from the link off presserfoot.com. Good work, Anna. It's fun to see you around.
Anna, that quiet book is amazing!! The best one I have ever seen. Good work! (I came here off the link from presserfoot.com. It is really fun to see you around again and know that you are right acoss the street. Keep up the good work.
Like the other posters, I found your blog via presserfoot and wow what inspiration! I still have the vintage one my mom sewed for me circa 1978 and always loved it.
I'd been hesitant to make one for my kids, because I wasn't sure if they'd play with it more than once, which wouldn't be worth all the work, but your page ideas as so great I'm sure they would now! Thanks for the great themes and now I can't wait to put one together and post all about it on my blog - I will definitely let you know how it turns out:)
Hi there! I found you today when you were featured at tipjunkie! I'ms SO glad too! I LOVE your ideas! This page is beautiful! I think I am going to start one for my 9 month old. You've given such great tutorials too! Thanks for sharing this! I passed it on to lots of my stumbleupon friends too!
--
Erin
ejsmomej at gmail dot com
http://www.google.com/profiles/ejsmomej
Wow, this is so cool! I can't believe I hadn't heard of your blog before! What a cool quiet book you've made!
I have been trying to decide what I'd like to do for my kids for Christmas (we have 4 kids). I would like to do mostly homemade gifts, and I think this would be a great thing to make for them if I could manage to get it done.
How hard was it to make?
Keep this up! I love your ideas! And thank you thank you for the instructions! I had no clue how to begin making one and now I have somewhere to look for ideas and instructions! Thanks!
Thanks a ton it has been a wonderful guide, now to make a quiet book is without a doubt easy utilizing your tips. Thanks
Post a Comment