

I had a lot of fun making this book and used a
lot of the tips I learned from reading this blog. One thing I did that helped a
lot, I think, was to plan all of my pages ahead. I also put the template and
materials for each page in its on zip-top baggie so if my son was napping I
could just grab a page and work on it. I made the car for the stocking page
while I was waiting at the doctor's office--which I could do because I just
have to bring my baggie ;) (great idea Jessica!)
SNOWMAN PAGE
The first page is a snowman. I first cut 3 felt
circles and sewed the eyes, nose and buttons to those. Then, I decided where he
would go on the page and cut out the area for the top hat, which is a glossy
bit of material for cover books. It worked well to recess the top hat, like
I've seen in his "That's Not My Snowman" books. I added a ribbon and
embellishments for the hat and then sewed the white circles down. For added
interest, I made a scarf by tying knots on some yarn because I don't knit or
crochet. The scarf is really two pieces, each sewn down on the book.
WISEMEN PAGE 
This is probably my favorite page because I
really like the colors. I drew a template for a wiseman and then use the same
template to make all 3. I made the faces profile because that's easier (for me)
and allowed the hair/beards to work in my favor. I had 3 interesting beads that
I used for the gifts. For the starry sky I made a cross for The Star and then
made French knots for the other stars. I had to stop myself several times
because I noticed I would start evenly spacing the stars and I wanted a more
random look!
CANDY CANES PAGE 
This page is a bit more interactive. I made 3
candy canes with velcro on the backs. I first sewed the ribbons to one candy
cane piece. Then I sewed the velcro (hook and loop tape) to another candy cane
piece that was the mirror image of the candy cane with the ribbon. Then, I
sewed the two together with red thread. 

I carefully measured where I put the velcro on the page so that the candy canes can go in multiple directions. A good tip I found before I started was to use the soft velcro to the page and the crunchy velcro to the piece, so if the piece isn't put back correctly, the velcro on the page won't damage the next page when the book is closed. I also made 2 extra candy canes that I keep in my sewing supplies in case these get lost.
WREATH PAGE
This wreath was fun to make. The "holly berries" are beads sewn onto the "holly leaves." The snowflakes are on pieces of felt that snap on and off. Here's a picture of the wreath from Jessica's flickr page:

This wreath was fun to make. The "holly berries" are beads sewn onto the "holly leaves." The snowflakes are on pieces of felt that snap on and off. Here's a picture of the wreath from Jessica's flickr page:

The wreath actually hides a pocket
for the snowflake snaps. I made 4 blue and 4 red snaps so they can be
rearranged to make different patterns. The ribbon can also be tied and untied.
This is a great page for practicing fine motor skills.
TREE PAGE

This Christmas tree can be "trimmed"
in that it can be folded to reveal the ornaments.
 For this page I cut out two
identical felt trees. Then, I sewed each ornament on one at a time. In between
each ornament, I folded the tree in half down the center to make sure that the
ornaments were spaced so they wouldn't touch when the tree was folded to the
plain, untrimmed side. After I had all of the ornaments on the tree, I sewed
the right half of the trimmed tree to the left half of the plain tree (adding
in loops to go around the buttons) and then sewed the other halves to the page.
The gifts are from a friend who makes her own Christmas cards.
For this page I cut out two
identical felt trees. Then, I sewed each ornament on one at a time. In between
each ornament, I folded the tree in half down the center to make sure that the
ornaments were spaced so they wouldn't touch when the tree was folded to the
plain, untrimmed side. After I had all of the ornaments on the tree, I sewed
the right half of the trimmed tree to the left half of the plain tree (adding
in loops to go around the buttons) and then sewed the other halves to the page.
The gifts are from a friend who makes her own Christmas cards.
STOCKING PAGE
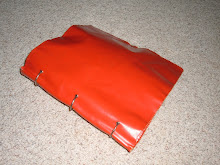
The stocking is made of faux fur. First, I made the items for the stocking. I chose toys I could draw easily: duck, baseball, truck. To make the truck have wheels, I cut 3 copies of the truck (2 orange, 1 black) and then cut the wheels off of the orange sides. I sandwiched the black between the orange sides and sewed them all together. Then, I sewed the toys to elastic, which I sewed to the page. Next, I sewed the cuff to the stocking and then sewed that to the page.

The stocking is made of faux fur. First, I made the items for the stocking. I chose toys I could draw easily: duck, baseball, truck. To make the truck have wheels, I cut 3 copies of the truck (2 orange, 1 black) and then cut the wheels off of the orange sides. I sandwiched the black between the orange sides and sewed them all together. Then, I sewed the toys to elastic, which I sewed to the page. Next, I sewed the cuff to the stocking and then sewed that to the page.

If I could do it again, I would have sewn the
elastic higher and had it fold back on itself a little, so the toys could come
out further.
SNOW GLOBE PAGE

This snow globe was surprisingly easy to make. The "snow" doesn't fall well in real life though :( I've tried sequins too but they also get stuck on the felt. Let me know if you have any tips! It's still a fun page and the snow does move, just not like a real snow globe. This was made the same was as the snowman's hat.
PRESENT PAGE 
The final page is a present. The ribbon can be tied and untied. The gift tag says it's to my son from Mom (I ran out of steam to write Mommy). The present is a pocket and inside is a cardboard snowman shape on a string.

The final page is a present. The ribbon can be tied and untied. The gift tag says it's to my son from Mom (I ran out of steam to write Mommy). The present is a pocket and inside is a cardboard snowman shape on a string.

Someday, when he is bigger, I'll hide other items in here.

I decided to make the outside look like a gift
and sewed green ribbon to green felt. I made the ribbon that ties the book
closed really long so that I can trim it as it frays over time. This part would
have been a lot faster by machine!
Then, I assembled the pages. Because I used felt for the pages, the needle had no problem going through all of those layers. Finally, I used black embroidery floss and blanket stitched around each page.
Then, I assembled the pages. Because I used felt for the pages, the needle had no problem going through all of those layers. Finally, I used black embroidery floss and blanket stitched around each page.
If you liked this book, you might like the next quiet book I made inspired by Brown Bear, Brown Bear, What Do You See? "


1 comment:
none of the images are loading - is it on my end our yours?
Post a Comment